Programming a Turtle in Python
Today we'll do something totally different. We build a turtle graphics class in Python.
More precisely, I'll tell you a bit about how I did that with one of my daughter. In sixth grade, they start learning something about computers, and so she had been told something about objects, attributes, and methods and had drawn "object diagrams" (with methods). Curiously, to me, She hadn't heard about classes yet (it seems to be one of the next sections in the book), and programming seemed far away from in the course.
This reminded me of Mephistopheles in Goethe's Faust:
Grau, teurer Freund, ist alle Theorie und grün des Lebens goldner Baum.
(Gray, dear friend, is all theory and gree life's golden tree. - Don't ask me about the green-golden color here.)
She had also dabbled in Python with a book I gave her (Jason Briggs: Python for Kids) and when I sat down a bit with her (but we didn't do classes yet, either).
After thinking about this a while, I thought that programming a turtle class would be just the right thing to combine practice and theory. Writing a basic turtle graphics thing should not be too hard if we do it together and so get a chance to skip over the "funny bits" (i.e. the details of drawing).
When I suggested that this is something we could do, she enthusiastically agreed. The first thing we did was recall (on paper, I'll just show you the scans) how she had used the turtle:
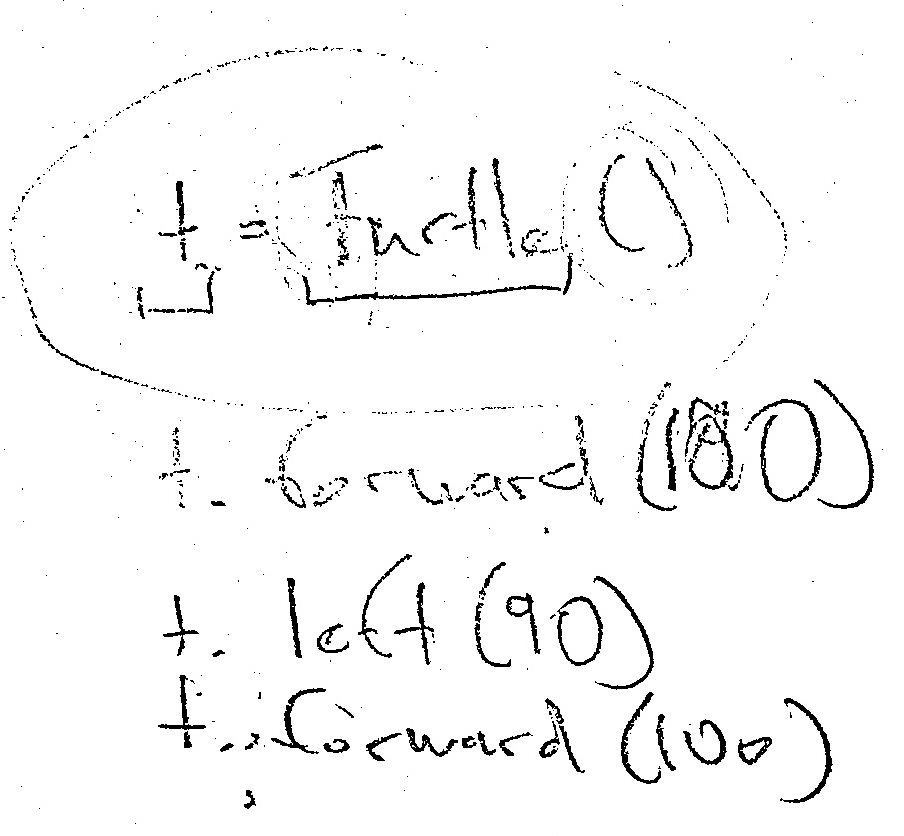
We found which was the object (the t), and the methods (forward, left), and I said some things about a class Turtle defining what kind of object we have.
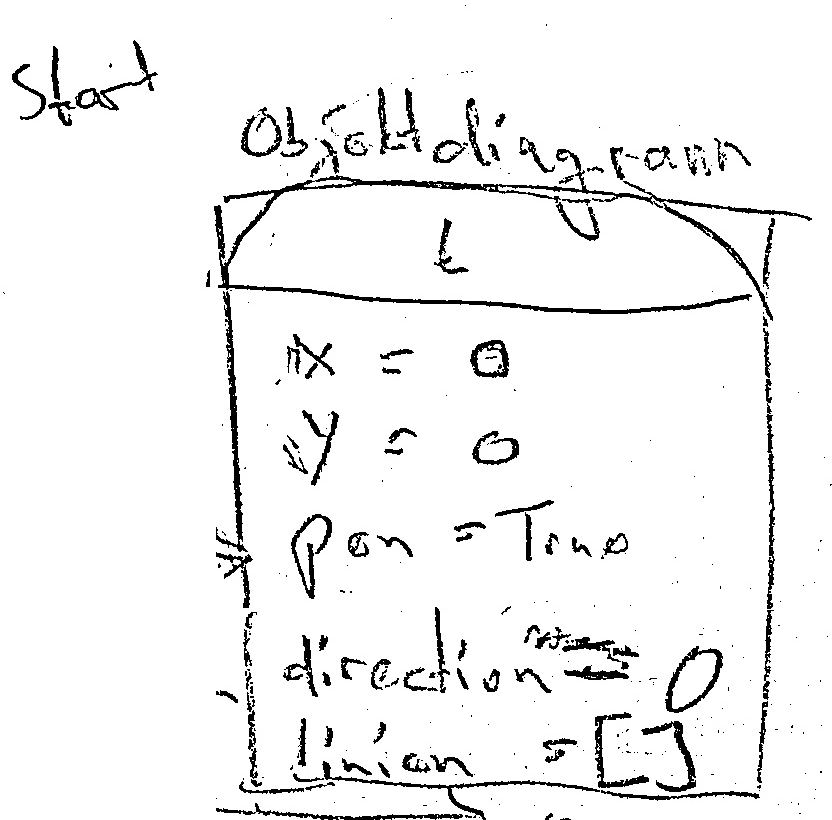
Next we started thinking about attributes and made a diagram of these like the ones she had seen at school. In addition to the x, y, pen, direction, we found that you'd need to remember which lines were in the picture, so we added a list linien (lines).
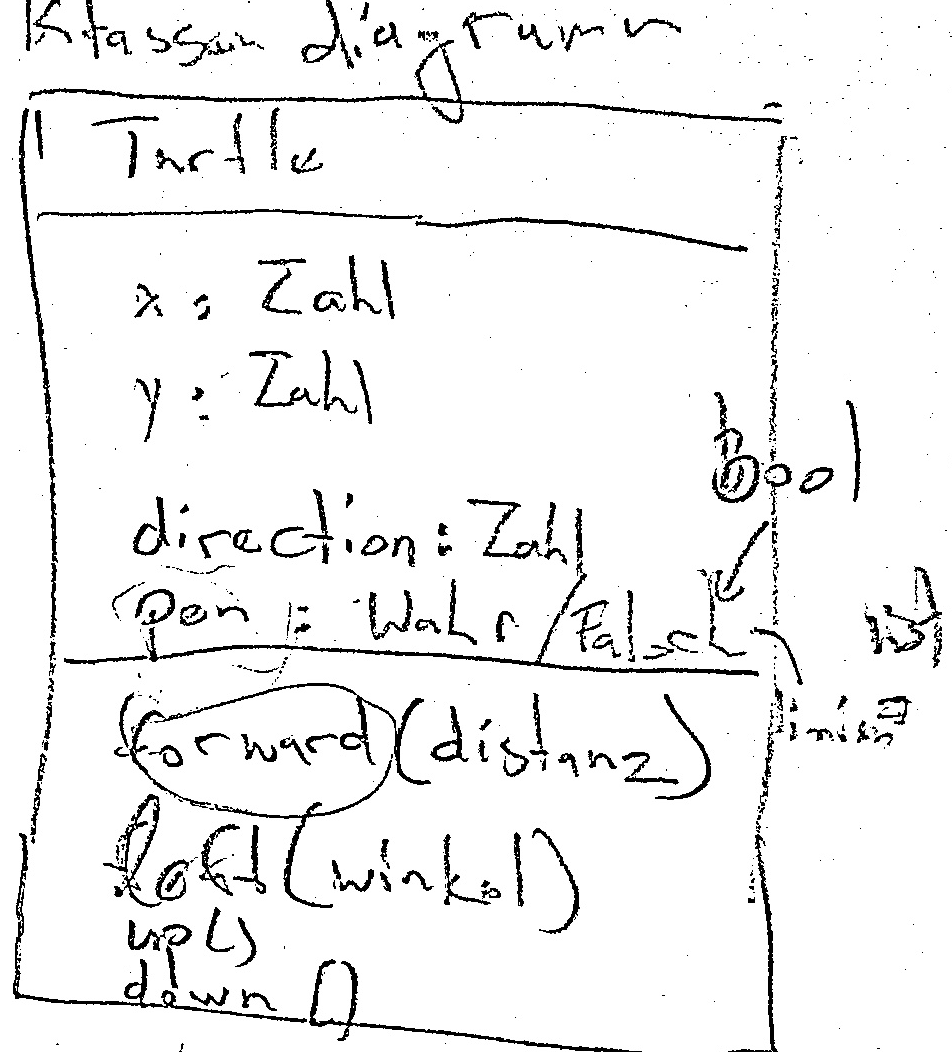
We then discussed a bit about how classes describe what an object is and which kind of objects we had (Zahl = Number) and made a class diagram:
Then it was coding time. I had tried it out before, but so our turtle would run in a Jupyter notebook and produce it's output via a SVG file.
When preparing, I had already found the imports, so we didn't talk much about them:
import svgwrite
import IPython
import math
import time
The first thing we would have to do is define the class and the __init__ method (which I described as setting up all the start attributes, which we got from the object diagram):
class Turtle():
    def __init__(self):
        self.x = 250
        self.y = 250
        self.richtung = 0
        self.malt = True
        self.linien = []
        self.delay = 0.5
        self.display = None  # komisch!
This is easy enough, but one can already discuss the role of self here and things about how methods work. Also, we changed the starting point, noting that the user wouldn't see this but it was more convenient.
Next, we thought about how forward would look like. It would have to update x and y. But to take direction into account, we need $sin$ and $cos$. This is a bit foreign to sixgraders, so we had a very handwavy explanation (which looses when you only see the final result rather than the interaction).
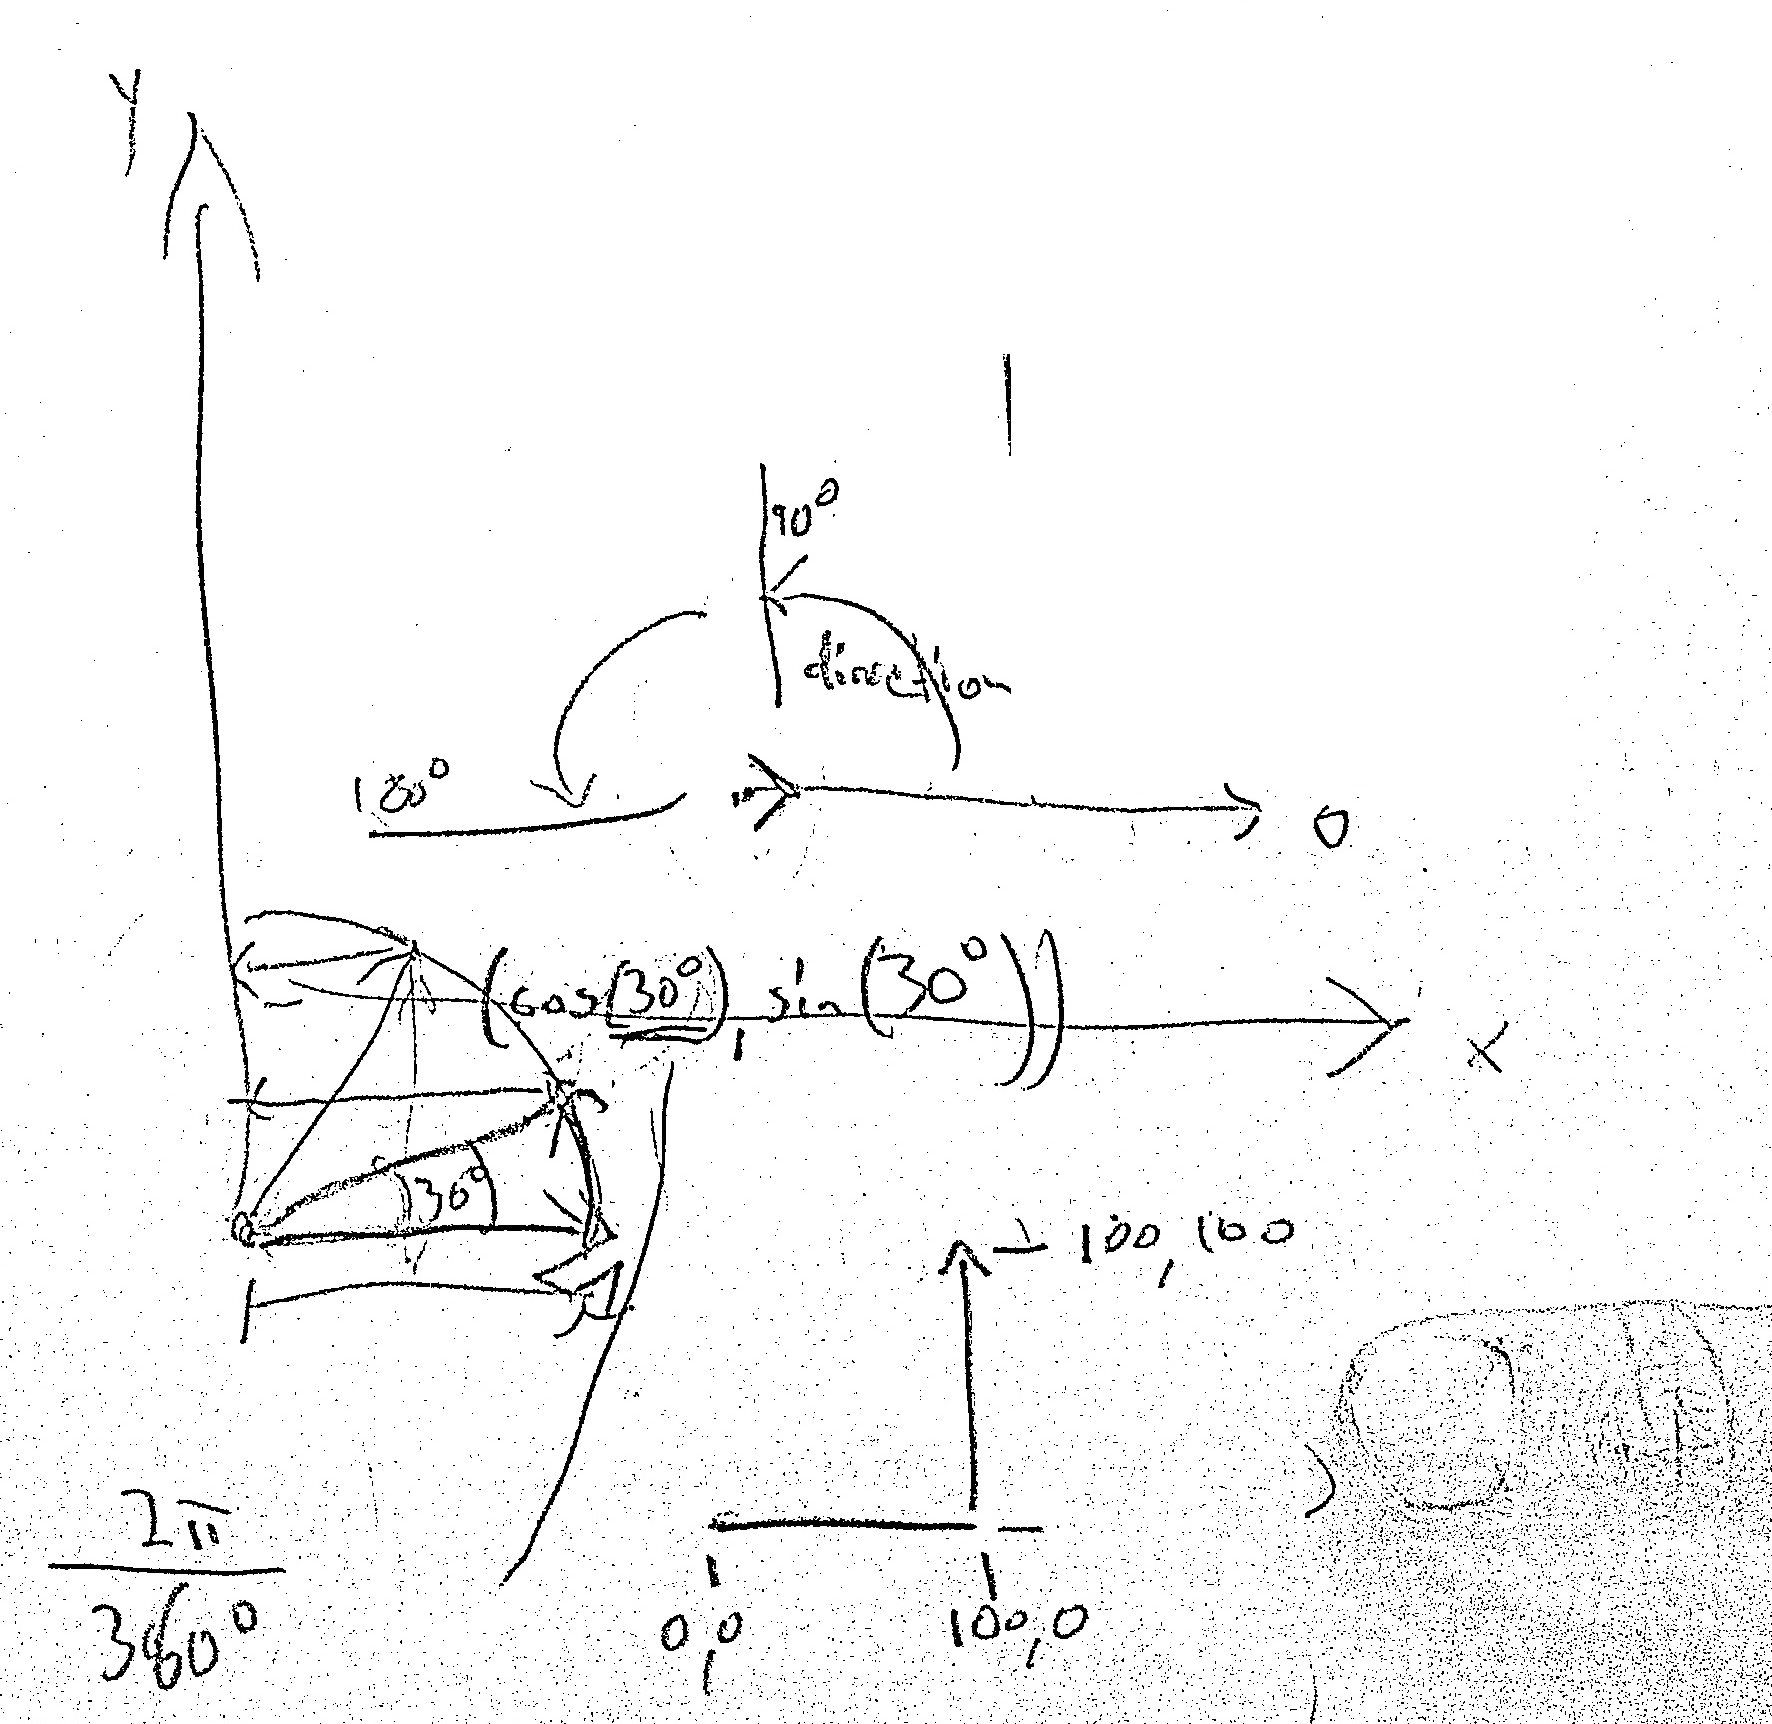
The computations are the part she wouldn't have been able to easily do on her own (I remember doing robot arm position computations in grade 10 or so), but that's why we've been doing it together. Also, she had angles with degrees but not radians, so you see this on the notes above, too.
Because we're now doing it ourselves, we're free to give the methods German names:When I was in high-school and taught (Pascal) programming courses for younger kids, I was foolish enough to tell them they could have arbitrary names, so they could name things kaesebrot. I didn't manage to convey that it's a bad habit to name things randomly. Of course, the great LibreOffice folks learnt the hard way that German names and comments can become peculiar, too.
    def vorwärts(self, distanz):
        start_x = self.x
        start_y = self.y
        rad = self.richtung * math.pi / 180
        self.x = self.x + distanz * math.cos(rad)
        self.y = self.y + distanz * math.sin(rad)
        self.linien.append(((start_x, start_y), (self.x, self.y)))
        self.draw()
I copypasted the draw and draw_turtle methods from my preparation and we roughly discussed what we did (that svg is the vector graphics, she had briefly encountered that in the school class) and the for loop over the lines but skipped over most fo the rest.
    def draw_turtle(self):
        c = math.cos(self.richtung / 180 * math.pi)
        s = math.sin(self.richtung / 180 * math.pi)
        x0 = self.x - 5 * c
        y0 = self.y - 5 * s
        x1 = x0 + 5 * s
        y1 = y0 - 5 * c
        x2 = x0 - 5 * s
        y2 = y0 + 5 * c
        self.svg.add(self.svg.line((self.x, self.y), (x1, y1), stroke=svgwrite.rgb(10, 10, 16, '%')))
        self.svg.add(self.svg.line((self.x, self.y), (x2, y2), stroke=svgwrite.rgb(10, 10, 16, '%')))

    def draw(self):
        self.svg = svgwrite.Drawing('test.svg', profile='tiny', size=('500', '500'))
        for l in self.linien:
            self.svg.add(self.svg.line(l[0], l[1], stroke=svgwrite.rgb(10, 10, 16, '%')))
        self.draw_turtle()
        if self.display is None:
            self.display = IPython.display.display(self.svg, display_id=True)
        else:
            IPython.display.update_display(self.svg, display_id=self.display.display_id)
        time.sleep(self.delay)
So now we had a tutle class that could move the turtle forward:
t = Turtle()
t.vorwärts(10)
This was our first session. To my great joy, she wanted to continue a couple of days later, so we went to add some more bits.
First we wanted the turtle to turn left. This is easy. We started with
    def links(self, winkel):
        self.richtung += winkel
        self.draw()
but found this goes right instead of left, so we flipped the sign.
Now we could draw a little hexagon:
t = Turtle()
t.vorwärts(10)
t.links(60)
t.vorwärts(10)
t.links(60)
t.vorwärts(10)
t.links(60)
t.vorwärts(10)
t.links(60)
t.vorwärts(10)
t.links(60)
t.vorwärts(10)
Next we implemented a right turn, too (and obviously, here she could take over):
    def rechts(self, winkel):
        self.richtung += winkel
        self.draw()
We wanted to implement drawing/non-drawing (malt for the German, pen in the diagram).
So we added an if to the forward-moving method:
    def vorwärts(self, distanz):
        start_x = self.x
        start_y = self.y
        rad = self.richtung * math.pi / 180
        self.x = self.x + distanz * math.cos(rad)
        self.y = self.y + distanz * math.sin(rad)
        if self.malt:  # only this and the indent is new
            self.linien.append(((start_x, start_y), (self.x, self.y)))
        self.draw()
Now we can do pen up and down methods:
    def stift_hoch(self):
        self.malt = False

    def stift_runter(self):
        self.malt = True
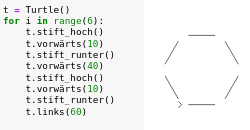
So now we could draw a hexagon without corners (a square without corners is the final programming puzzle (i.e. exercise) in the first turtle chapter of Briggs' book):
t = Turtle()
for i in range(6):
    t.stift_hoch()
    t.vorwärts(10)
    t.stift_runter()
    t.vorwärts(40)
    t.stift_hoch()
    t.vorwärts(10)
    t.stift_runter()
    t.links(60)
Now I challenged her to implement backward without copying the code. After a bit of her thinking, I aksed her to walk to the other side of the room an come back and so she came up with:
    def rückwärts(self, distanz):
        self.links(180)
        self.vorwärts(distanz)
We tried it and discovered we need to turn at the end, too:
    def rückwärts(self, distanz):
        self.links(180)
        self.vorwärts(distanz)
        self.rechts(180)
That's a good solution. The clever ("Rechtsüberholer" for the traffic violation) version would be:
    def rückwärts(self, distanz):
        self.vorwärts(-distanz)
But note that we're stretching the meaning of "distance" here, maybe it should have been called steps...
So this was our little excursion in how to program with objects, attributes, and methods. I thought it was a good example of something nice enough to be a fun result but still simple enough to program in a couple of hours or so.
About
Here we have a kids-friendly programming bit, but if you were looking for Workshops or PyTorch online courses, I might have something for you, too.
I hope you enjoyed this little exercise, maybe it can inspire you to do some programming with your kids.